Showing posts with label high. Show all posts

Multiple Applications of High Power LEDs

Friday, September 19, 2014 | Labels: , , , , , | 0 comments |
Nowadays, high-power light-emitting diodes (LEDs) LXHLMW1C are available in the market. These white LEDs contain indium-gallium-nitrogen (InGaN). The LEDs’ emitting capacity is 20 candela (Cd). We can use these LEDs for automatic garden lighting and wide voltage operation by applying different voltages.
Multiple Applications of High-Power LEDs


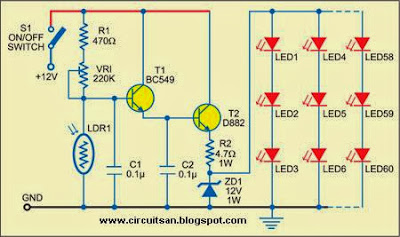
Fig. 1: Circuit for automatic garden lighting

Fig. 1 shows the circuit for automatic garden lighting. Switch S1 connects 12V to the circuit built around transistors T1 and T2. Light-dependent resistor LDR1 is used to sense the light intensity and preset VR1 is used to adjust the threshold of light. The resistance of LDR remains low in daylight and high at night (in darkness).

In the morning, light falls on LDR1 and transistors T1 and T2 are cut-off. As a result, 12V supply is not available to the LEDs. In the evening, when no light falls on LDR1, transistors T1 and T2 conduct to provide 12V to the LEDs. This turns on all the LEDs (LED1 through LED60). The on/off switching level can be adjusted by 220 kilo-ohm preset according to the intensity of the light.

The emitting capacity of LEDs (UW-510CWH) used here is 8 Cd. Since a total of 60 of these LEDs have been used, this unit will provide luminous intensity equivalent of 480 Cd. The LEDs are arranged in twenty rows, with each row having three LEDs in series. The input voltage is approximately 12V and all the LEDs are spaced 1 to 1.5 cm apart.

Fig. 2: Circuit for wide-voltage operation

The entire circuit, except LDR1, can be assembled on any general-purpose PCB. House the PCB in a box and, using two long wires, mount LDR1 at a place where light falls on it directly. Now place the unit in your garden.

You can use the switching section for other systems as well. You just need to remove the LED section from the circuit and connect the switching section to the desired system. So the system will now automatically switch on in the evening and switch off in the morning.

Fig. 3: Pin configuration

Fig. 2 shows a wide-voltage operation circuit. Here, the high-power LED61 (LXHLMW1C) gives a power equivalent of 20 Cd. This LED has a metallic back for mounting on a heat-sink. Its rated maximum input DC voltage and current are 3.6V and 350 mA, respectively. Regulator IC LM317 (IC1) provides a constant voltage of 4.7V. Resistors R3 and R4 limit the current through the LED. The LED is very sensitive to voltage inputs. In the 2.5V-3.5V region, each millivolt variation changes the current through the LED logarithmically. Transistors BC549 and D882 (T3 and T4) and resistor R6 provide a constant current to LED61. The unit gives a constant lighting for voltages ranging from 7V to 25V.

Fig. 3 shows pin configuration of regulator LM317 and transistors D882 and BC549. Use heat-sinks in regulator LM317 and transistor D882 before soldering them onto the PCB.
Continue reading...

20W 12V Compact High Performance Stereo Amplifier

Wednesday, June 12, 2013 | Labels: , , , , , , | 0 comments |
Amplifiers which run from 12V DC generally don’t put out much power and they are usually not hifi as well. But this little stereo amplifier ticks the power and low distortion boxes. With a 14.4V supply, it will deliver 20 watts per channel into 4-ohm loads at clipping while harmonic distortion at lower power levels is typically less than 0.03%.

This is an ideal project for anyone wanting a compact stereo amplifier that can run from a 12V battery. It could be just the ticket for buskers who want a small but gutsy amplifier which will run from an SLA battery or it could used anywhere that 12V DC is available – in cars, recreational vehicles, remote houses with 12V DC power or where ever.

12 Volt 20W Stereo Amplifier circuit schematic
20W Stereo Audio Amplifier

Because it runs from DC, it will be an ideal beginner’s or schoolie’s project, with no 240VAC power supply to worry about. You can run it from a 12V battery or a DC plugpack. But while it may be compact and simple to build, there is no need to apologise for “just average” performance. In listening tests from a range of compact discs, we were very impressed with the sound quality.

Long-time readers might recall that we presented a similar 12V power amplifier design back in May 2001. It was a similar configuration to this one but it is now completely over-shadowed by the much lower distortion and greatly improved signal-to-noise ratio of this new design. In fact, let’s be honest: the previous unit is not a patch on this new design. It used two TDA1519A ICs which resulted in distortion figures above 1% virtually across the board and a signal-to-noise ratio of only -69dB unweighted.

20W Stereo Amplifier circuit schematic
20W Stereo Amplifier Circuit

However, by using the TDA­7377 power amplifier IC and making some other improvements, the THD (total harmonic distortion) of the new design is about 50 times better than the older unit (see performance graphs for details). The bottom line is that the THD under typical conditions is around just 0.03% or less. It is also able to deliver more output power due to the improved output transistors in the new power amplifier IC.

In addition, its idle power consumption is low – not much more than 1W. As a result, if you don’t push it too hard it will run cool and won’t drain the battery too quickly. And because the IC has self-protection circuitry, it’s just about indestructible. It will self-limit or shut down if it overheats and the outputs are deactivated if they are shorted.

Circuit diagram:
12V 20W Stereo Amplifier circuit schematic
20W Stereo Amplifier Circuit Diagram

With a 12V supply, the largest voltage swing a conventional solid-state power amplifier can generate is ±6V. This results in a meagre 4.5W RMS into 4O and 2.25W RMS into 8O, without considering losses in the output transistors. Even if the DC supply is around 14.4V (the maximum that can normally be expected from a 12V car battery), that only brings the power figures up to 6.48W and 3.24W for 4O and 8O loads respectively – still not really enough.

There are three common solutions to this problem. The first is to boost the supply voltage using a switchmode DC converter. This greatly increases the cost and complexity of the amplifier but it is one way of getting a lot of power from a 12V supply. However, we wanted to keep this project simple and that rules out this technique.

Parts layout:
PCB layout of compact 12V 20W Stereo Amplifier circuit schematic

There are variations on the boosting method, such as the class H architecture used in the TDA1562Q IC featured in the Portapal PA Amplifier (SILICON CHIP, February 2003). It is able to achieve 40W/channel but with >0.1% THD. In that case, the amplifier output itself provides the switching for a charge pump. The second method is to lower the speaker impedance. Some car speakers have an impedance as low as 2O, which allows twice as much power to be delivered at the same supply voltage. However, we don’t want to restrict this amplifier to 2O loudspeakers.
Author: Nicholas Vinen - Copyright: Silicon Chip
Continue reading...

Dual Polarity Unregulated PSU For High End Audio Amps

Wednesday, May 29, 2013 | Labels: , , , , , , , , | 0 comments |
A power supply suitable for use with the hi-fi amplifiers presented in the predeeding project is perfectly simple, and no great skill is required to build (or design) one. There are a few things one should be careful with, such as the routing of high current leads, but these are easily accomplished. Design of this power supply is very simple. A 4 ampere fuse is used to protect the transformer and two LEDs at the end of this circuit are used to indicate power state On and Off. At the ouptut there are 6 capacitors used you can reduce the quantity of these filter capacitors to 2 or according to your own choice.

click on the images to enlarge
Continue reading...

LM3875 High Audio Amplifier 56W

Friday, May 17, 2013 | Labels: , , , , | 0 comments |
LM3875-High Audio Amplifier 56W
The LM3875 is an audio amplifier for high power output capable of delivering 56W of continuous average power to a load 8. The performance of the LM3875, utilizing its maximum instantaneous auto temperature (° Ke) (Spike ™) protection circuitry, places it in a class above discrete and hybrid amplifiers by providing a yes, dynamically protected area of safe operation (SOA). SPIKE protection means that these parts are fully protected against output overvoltage, voltage surges caused by shorts to the supplies, the peak temperature thermal runaway, and instantaneous.

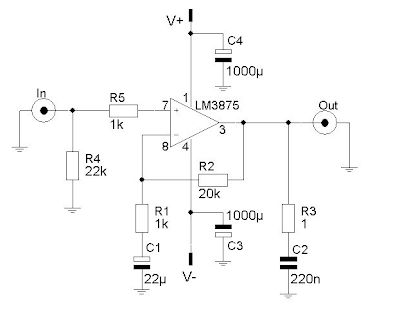
This amplifier circuit is based on the non-inverted GainClone standard configuration. I did some calucaltions the feedback resistor and other components in order to check the gain, etc. For more background on the calculations relevant to GainClones in the background section.

LM3875-High Audio Amplifier 56WParameters IC LM3875

Output Current 6000 mA.
Offset Voltage max, 25C 10 mV.
Gain Bandwidth 8 MHz.
Supply Min 20 Volt.
Supply Max 84 Volt.
Supply Current Per Channel 30 mA.
PowerWise Rating 2 3750 uA/MHz.
Slew Rate 11 Volts/usec.
Input OutputType Not Rail to Rail.
Max Input Bias Current 1000 nA.
Special Features AvCl>10.
Function Op Amp.
Channels 1 Channels.
Temperature Min 0 deg C.
Temperature Max 70 deg C.
Continue reading...